We can picture it now: you’re stuck inside, bored, just dying for some fun and easy sewing projects for beginners.
It isn’t difficult to learn how to sew, and it’s never too late to learn!
Even if you have absolutely no experience, you can create useful and cute projects all on your own.
Contents
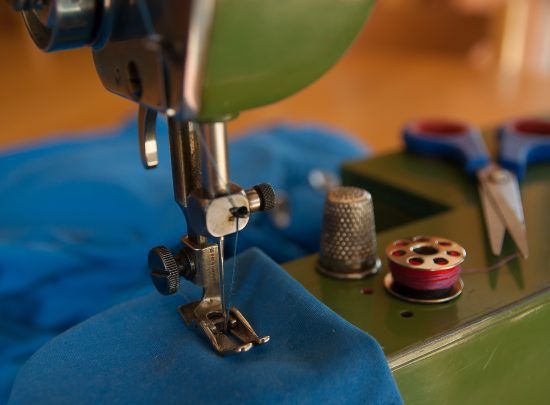
Easy Sewing Projects for Beginners
The best sewing projects, even if you’re not a beginner, are always going to be the easy ones.
These projects don’t call for too much fabric or any fancy components. All you really need is a sewing machine and a little determination.
Without further delay, let’s get to these easy sewing projects for beginners!
Recommended Read: 10 Simple Sewing Projects Anyone Can Do
Pillowcase

Our first project for you is a pillowcase!
This pillowcase is a standard size, and if you want a king or queen size, you’ll have to make the adjustments yourself.
For this, you’ll need a yard or two of your desired fabric, a sewing machine, straight pins, an iron, scissors, and thread.
Start by cutting two pieces of fabric, and make sure they’re the same size. They should be 21 inches wide and 29.5 inches long. This should give you a 20 by 26-inch pillowcase when you’re done.
Create a seam by folding the outer edges of your first piece of fabric by 3.5 inches. Once it’s folded, iron it and pin it into place.
From there, you’ll want to sew the bottom of the fabric to itself to create a sort of faux cuff.
Repeat the previous steps with your second piece of fabric before you move on.
Once that’s done, pin the sides of the two pieces of fabric to each other and line up the cuffs.
The cuffed side of your pillowcase will be its opening, so be sure you don’t sew it shut!
Once your cuffs are lined up, pin your remaining three sides together, and then use your sewing machine to stitch a straight line around the three sides of your pillowcase.
After you’ve sewn the three sides together, all that is left to do is flip your pillowcase right side out and use it.
Simple zipper pouch
An adorable zipper pouch is great for storing away tiny trinkets, spare change, and even art supplies!
For this, you’ll need a zipper, two 9 by 7-inch lining fabric pieces, and two outer fabric pieces the same size as the liners.
Measure your zipper, and make a mark about half an inch from where the edge of the pouch’s fabric will come together.
Your zipper should be about 9 inches long. Once you’ve cut it, place the zipper’s right sides together with one of the pieces of your outer fabric.
Use the zipper foot on your sewing machine to stitch your zipper onto your fabric.
Repeat with the other piece of outer fabric, and use a topstitch to keep the fabric from popping up and getting caught in your zipper.
Now unzip your zipper about 3/4 of the way and fold your pouch so your outer fabrics are right sides together. Do the same for the liners as well.
Match your outer fabric at the zipper, and fold its teeth towards the inner lining.
Folding the zipper’s teeth is important because it will ensure that the finished project isn’t left with a pinched-looking zipper.
Now it’s time to stitch around the edges, connecting the lining and the outer fabric.
Make sure you leave a hole so you can turn the project the right way out when you’re done. Then cut the excess fabric of the corners off. Just be sure you don’t cut through the stitches!
Then sew up the hole in the lining from the outside, and you’re finished!
Simple summer backpacks

This little drawstring bag is just the cutest thing. It’s perfect for trips to the pool or beach and is one of the best easy sewing projects for beginners.
You’re going to need fabric, string or trim for straps, and eyelets.
Start by cutting your fabric into four 15 by 15-inch pieces.
Sew the outer pieces of the fabric together, right sides facing each other. Make sure to leave the top seam open!
Once you’ve sewn the pieces together, press the seams open and clip off the corners.
Then repeat with the remaining two liner pieces, and slip them into the outer fabric. Make sure the wrong sides are facing.
Pin the top edges so they’re even, and all of the side seams match.
Now, serge the backpack’s outside and lining pieces together. Then fold the top edge down about an inch and pin it into place to form a casing.
Once you’ve finished your casing, unpick the seam on the outside. You only want to undo the stitches a little bit, reinforcing the seam so all of your work doesn’t unravel.
Cut about two yards of string and then feed it through your backpack’s casing.
Once your string is in your backpack, you can set your eyelets! Follow the instructions on your eyelet package, looping your string through them once they’re on the bottom corners of your bag.
And finally, tie your strings together to form straps, and you’re ready to fill your bag with fun!
Recommended Read: Book Bag Tutorial
Drink cozy

A drink cozy is both cute and useful! This cozy will fit on just about any can.
Grab some fabric, thermal lining material, and thread. You’ll obviously also need a pair of scissors, needles, and a ruler to make this cozy correctly.
Take your fabric and cut a piece that measures 10 by 8.5 inches. Then take your thermal lining material, and cut a piece that measures 10 by 4 inches.
Press a 1/4 inch seam on the wrong side of your fabric along the 10-inch side.
Now pin your thermal material to the inside, or the wrong side, of the outer fabric.
Now sew together the two 8.5-inch sides together, making sure to catch the thermal liner in your stitch.
Take your time to sew a seam along the top and bottom to close up the edges.
Remember that it doesn’t have to look perfect!
Just take your time with the seam, and once you’re finished, you’ve done it. Enjoy your new drink cozy!
A headband

Another super easy sewing project is a headband! These are a ton of fun to make, and super useful in your day-to-day.
For this, you’ll need cotton fabric, safety pins, scissors, elastic, a ruler, an iron, thread, and straight pins.
Your first step is to cut your fabric and elastic. Your two fabric pieces should measure 18 by 4 3/4 and 9 by 1 3/4 inches, respectively.
If you want a reversible headband, your fabric should be 18 by 2 3/4 inches.
Your piece of elastic should be 6 inches long.
Take your fabric and fold them both in half, length-wise. Then stitch the sides together along the long side. Once you’re done, trim the excess, and turn the fabric right side out.
Now iron your pieces down, tucking half an inch of fabric into the inside of your headband.
With your smaller piece of fabric, you’re going to feed the elastic through it.
Use your safety pin and attach it to your elastic, pulling it through the smaller piece of fabric. Once your elastic is nestled in the fabric, take the safety pin out and sew it all together.
Now attach the elastic part of the headband to the longer part. Pin the pieces together, sew, and you’re done! It’s really that simple!
No products found.
A bookmark
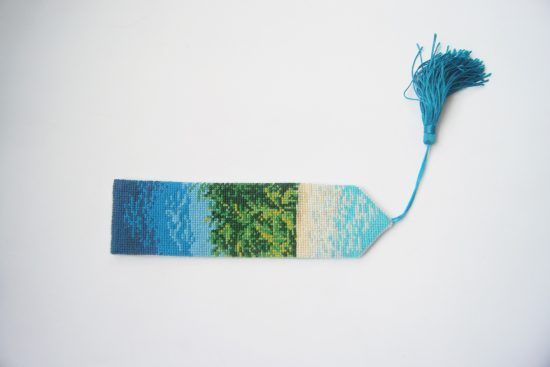
If you’re a creative bookworm that always seems to be missing a bookmark, this is the project for you.
All you need is a sewing machine, some fabric scraps, scissors, ribbon, thread, fusible fleece, and a bookmark template.
The template is optional, but it makes things easier.
Your finished product should be about 2 inches wide, and 8 1/2 inches long.
Start by sewing your bits of scrap together. There are no hard rules here, all you need to do is leave a quarter of an inch seam allowance, pressing them open as you go.
Once you feel that you’ve sewn enough bits together, compare it to your template if you have it and see if your piece is large enough.
You’ll want to have two 2 by 8 1/2-inch pieces, and a piece of fusible fleece that is a bit smaller.
Now attach your fusible fleece to your front patchwork piece.
Then place the back piece on the other side, and sew it on, leaving the short edge unsewn.
Once that’s done, turn your bookmark right side out, and add your ribbon. Once your ribbon is in the center, close up the top and bottom of your bookmark, and you’re done!
T-shirt pocket
If you have a favorite T-shirt that you feel needs its own little pocket, this project will only take about 10 minutes.
All you need is a clean, dry T-shirt, a pocket template, fabric, scissors, thread, and a sewing machine.
Start by printing out and using a pocket template, placing it on your fabric. Cut out two identical pieces of fabric, and stitch them together, leaving a half-inch seam allowance.
Be sure you leave a two-inch opening so you can turn your pocket the right way out.
Once you’re done stitching, clip the corners of the pocket and iron it down.
Once you’ve sewn your fabric together, pin your pocket to your T-shirt wherever you’d like it to be. Then stitch your pocket to the shirt!
Remember to only sew three sides of the pocket!
Upcycled T-shirt baby blanket
Whether you’re welcoming a new member to your family, becoming an aunt or uncle, or expecting a grandchild, a new baby blanket is just the project for you.
For this blanket, you’re going to need at least one old T-shirt. You can use up to nine T-shirts in this project if you want. It depends on how many squares you plan on sewing together.
You’ll also need knit fabric, ribbed knit fabric, pins, needles, and a walking foot for your sewing machine.
You can also use a 12 1/2 by 12 1/2 quilt ruler to make things a little easier. But you don’t absolutely need it, so if you don’t have a quilt ruler, don’t worry about it.
Let’s get stitchin’
Your first step is to cut up your T-shirts into 12 by 12-inch squares. If you want to make them larger, you can. That’s up to you.
You’ll want to cut up your knit fabric into 12 by 12-inch squares as well.
Once you have your squares, lay them out in three rows of three, and pin your squares together. Now use a stretch (or jersey) needle and install your walking foot.
Set your stitch so it zig-zags slightly, stitching all of your squares together, starting with your top row and making your way down.
Be sure to leave a half-inch seam allowance!
Once all of your squares have been sewn together, you can cut a 38 by 38-inch piece of backing fabric.
Lay your backing fabric down flat with the right side down. Lay your squares on top with the right side up, and smooth it all out so your baby quilt is flat.
Now trim the backing fabric so it’s the same size as your stitched squares.
Once both of your pieces are the same size, you can move on to cutting your rib-knit fabric.
Use pins to keep the rib-knit fabric on the edge of your blanket, leaving half of an inch for seam allowance.
Make sure your machine is able to catch all of the layers of fabric and everything gets sewn together.
Once you’ve sewn the edging on, your blanket will look strange. That’s not your fault — that’s normal! Just steam the blanket’s binding with an iron until it’s to your liking.
After that, you’re done and you can gift it to your baby!
Recommended Read: 27 Adorable DIY Gifts To Make For Baby
Say It Ain’t Sew
Now you have some easy sewing projects for beginners at your disposal, ready to be made at any moment.
No matter what you make, we hope your projects come out amazing, and you have a great time sewing them! Best of luck to you — we know you can do it.
Which easy sewing projects for beginners are you making?
Do you have any easy sewing projects for beginners you would like to add?
Leave us a comment down below! We’re always looking forward to hearing what you have to say.
Mady Oswald is a writer in both realism and fiction, with a love for baking and animals.
Last update on 2026-05-08 at 23:44 / Affiliate links / Images from Amazon Product Advertising API