Throw a creative spin on your next birthday party guest book. It’s a creative way for people to write a message for the birthday kid and then it can be displayed all year!
Whether you’re a crafty mom (bless you) or someone like me who just hopes the glue dries in the right place, this project is foolproof. No artistic skills required—just a little love, some tape, and probably a strong cup of coffee. Let’s get into it!

What Exactly Is a Birthday Memory Board?
It’s basically a highlight reel of your child’s year, but instead of living on your phone (where, let’s be real, no one ever organizes photos), it gets turned into an adorable, display-worthy collage.
I include things like:
✔️ Favorite photos (the cute ones AND the funny, chaotic ones)
✔️ Milestones (first lost tooth, learned to tie shoes, finally ate a vegetable without gagging)
✔️ Quotes that made me laugh (or cry)
✔️ Current obsessions (dinosaurs, unicorns, Peppa Pig, or whatever phase we’re in)
✔️ A sweet note from me (cue the mom tears)
I basically take all the little details I don’t want to forget and slap them on a board for everyone to see.
How to Make a Birthday Memory Board Without Losing Your Mind
I promise—this is not a complicated project. If I can do it between managing school drop-offs and finding snacks every five minutes, so can you.
Step 1: Gather Your Stuff
You’ll need:
✔ Poster board or a canvas (I get mine at the dollar store)
✔Sharpies or Paint Pens or Markers (to write all the fun details)
✔ Stickers, washi tape, or decorations (optional, but fun)
✔ Glue stick or double-sided tape (because kids + glue bottles = disaster)
✔ E6000 (although I used Liquid Fusion)
✔Printed photos (yes, you have to finally print them)
If you want to go next level, you can add cute extras like ribbons, scrapbook cutouts, or even a birthday theme color scheme. (I usually keep it simple, but hey, go crazy!)
Step 2: Choose the Best Photos (AKA the Hardest Part)
I take a ridiculous number of photos throughout the year, so narrowing it down is a struggle. My rule of thumb: pick 10-15 of the best ones that show their personality, milestones, and random fun moments.
Must-haves include:
📸 A baby or toddler pic (so we can all gasp at how much they’ve grown)
📸 A silly, goofy moment (because those are always the best)
📸 A “big moment” shot (first day of school, riding a bike, etc.)
📸 A recent fave (aka whatever photo you keep showing everyone on your phone)
If I’m feeling fancy, I arrange them in a collage before printing, but most of the time, I just cut and paste them straight onto the board.
Step 3: Add Fun Facts & Memories
This is where the board really comes to life. I jot down:
- Favorite show: “Bluey” (I’ve now seen every episode 7,000 times.)
- Favorite food: “Chicken nuggets, but only if they’re shaped like dinosaurs.”
- Biggest achievement: “Learned to count to 20… but skips 15 every time.”
- Funniest quote: “Mom, are we rich? Because I have SO many stickers.”
I love adding little handwritten notes, and sometimes I even ask family members to write messages too. It makes the board feel extra special.
Step 4: Decorate & Assemble (a.k.a. Make It Cute, But Not Stressful)
I start by laying everything out before committing with glue (because once it’s stuck, it’s stuck). Then I:
- Outline the photos with colorful washi tape
- Stick on a few themed stickers (last year, it was superheroes)
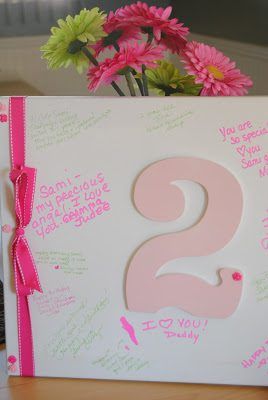
- Add a big birthday number right in the center
I don’t stress about making it “perfect.” In fact, a little messy makes it more personal!
If you’re running short on ideas, here’s a few I wrote over the years.
Step 5: Display It & Enjoy the Magic
I put the board front and center at the party—either near the cake table or the entrance so guests can admire it. Sometimes, I even leave a little blank space for guests to write birthday messages. (Kids LOVE this part!)
After the party, I save it as a keepsake, because let’s be honest—these years fly by too fast, and I want to remember every little moment.
Also I chose colors that work in Sami girl’s room, so I can use it as part of her decor this coming year! It’s a great way for people to “sign a guest book” that can be displayed all year!
Other Ways to Use a Birthday Memory Board
Since making these, I’ve realized they work for more than just birthdays:
📸 Baby’s First Birthday Milestone Board – A sweet way to document that first crazy year.
📖 Scrapbook Alternative – If I’m too busy to make an actual scrapbook (spoiler: I always am), this is a quick way to capture memories.
🎈 Sibling or Family Version – I’m considering making one for our whole family each year!
Final Thoughts (a.k.a. Why You Need to Try This)
Making a Birthday Memory Board has become one of my absolute favorite traditions. It’s simple, fun, and full of heart—a perfect way to celebrate my child’s journey each year. It also makes me feel slightly less guilty about the 5,000 photos I hoard on my phone.
So if you’re looking for a meaningful, easy DIY project that will make birthdays even more special, this is it! Give it a try, and trust me—you’ll be hooked.
Now, excuse me while I go print out even more pictures for next year’s board. 🎂💕