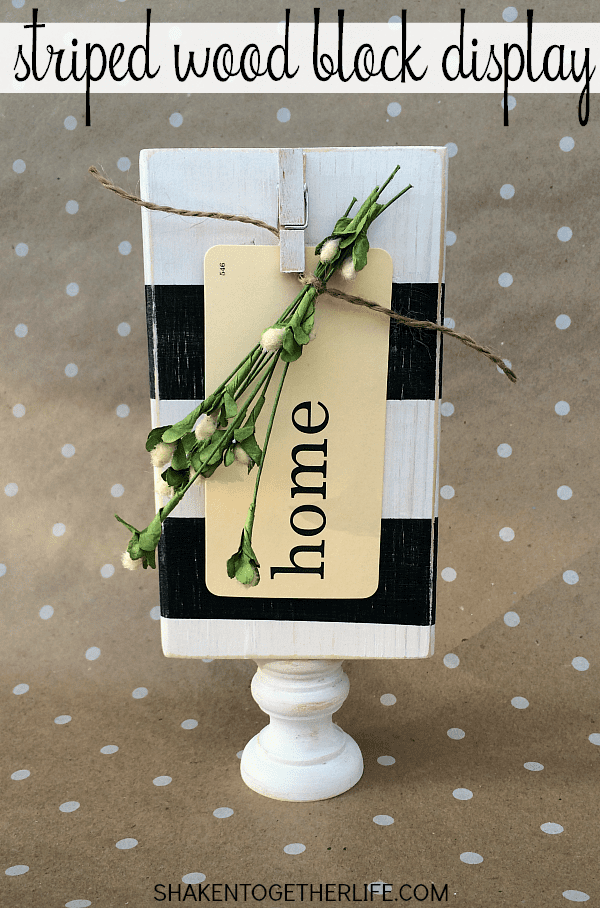
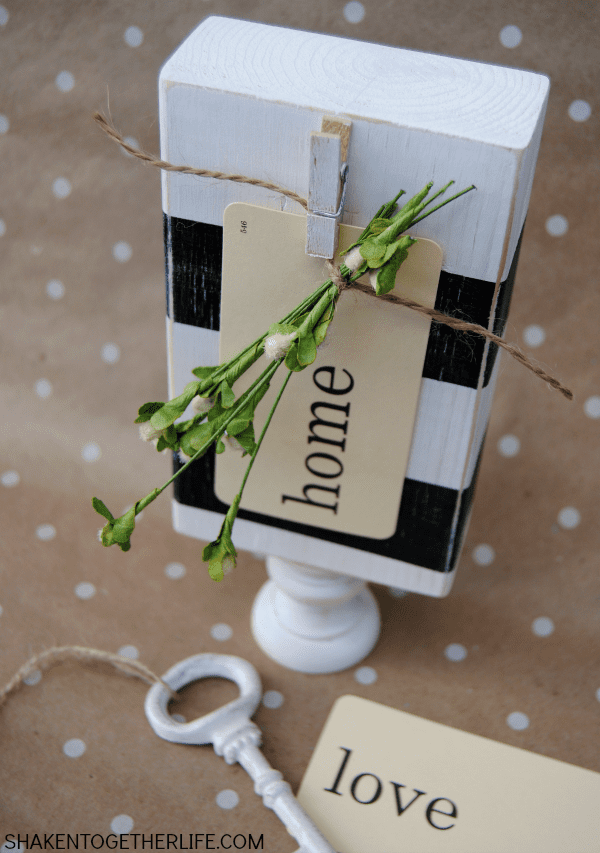
With crisp black and white stripes and rustic charm, this Striped Wood Block Display is perfect to show off a picture of your family, display a few little keepsakes, hold wedding table numbers or even a monogram! And you won’t believe how easy it is to DIY!
Oh! And before we get started … hi! I’m Keri and I blog over at Shaken Together where I am celebrating a creative life with easy recipes, seasonal projects and gifts, crafts and DIYs! I am married to the sweet hubby I met on a blind date and we live a pretty fun life in Florida with our two boys, three cats and a healthy little dose of crazy! I love mason jars, paint, pretty paper, lists, the color red, reality TV, sand between my toes and singing at the top of my lungs!
Now, that the introductions are out of the way, let’s settle in, chat and craft! Here are the supplies you’ll need for this project:
- Wood block (mine is a 6 inch long piece from a 2 x 4)
- Black & White acrylic paint
- Paint Brush
- Painters Tape
- 1 1/2 inch wooden candle stick
- Small wooden clothespin
- Craft glue or hot glue gun
- Fine grit sandpaper
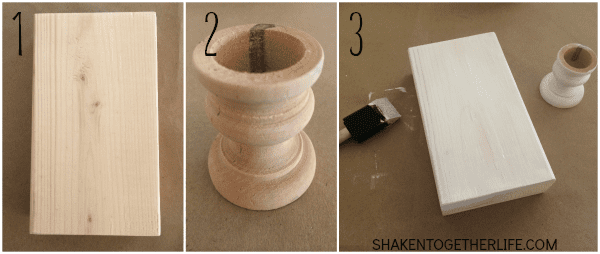
1. Using fine grit sand paper, sand any rough edges, the sides and faces of the wood block.
2. Sand any rough edges on the wooden candle stick.
3. Paint the wood block and the candle stick with two coats of white acrylic paint.
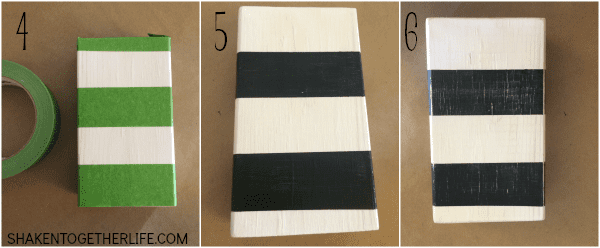
4. Once the paint is dry, use painters tape to define where the black stripes on your wood block will be.
5. Paint the exposed wood {the white showing between the painters tape stripes} with two coats of black acrylic paint. Remove painters tape before the black paint dries.
6. Once the black stripes are dry, use sand paper to distress the edges, sides and faces of the wood block. The more you sand, the more rustic the wood block display will be!
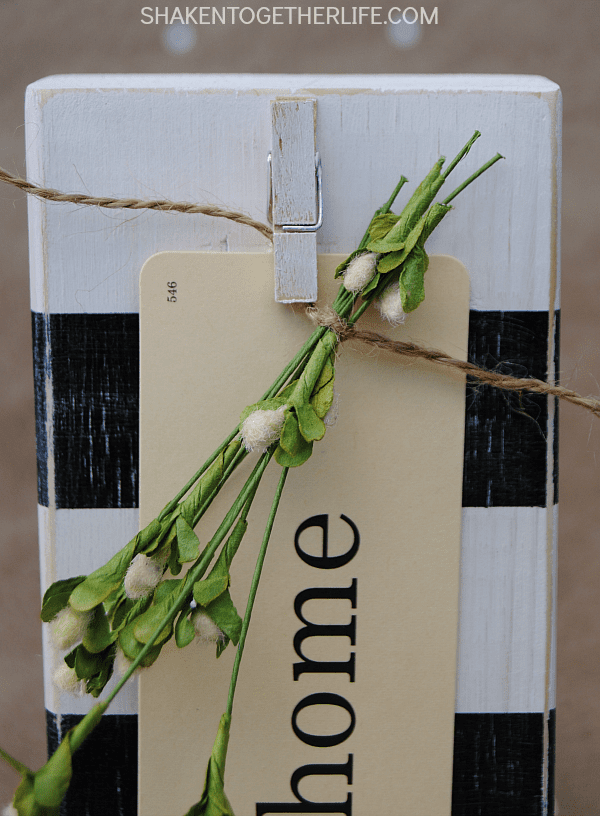
7. {Not pictured} While you are waiting for the stripes to dry, paint the front of a small wooden clothespin with the white acrylic paint and glue it to the top of the front face of the wood block. Finally, glue the wood block vertically onto the wooden candle stick. I used craft glue, but you could probably also use a hot glue gun, too.
Instead of a photo, I tucked a little card that says ‘home’ in the clothespin. Then, I bundled together a few clippings of artificial flowers {I think they look like a bundle of dried herbs}, tied them together with twine and clipped one end of the twine in the clothespin as well.
I am totally LOVING the black and white stripes and the layering of a few little odds and ends for a fun and easy home décor piece. Place it on a mantel or in a vignette, use them as centerpieces for a shower or party, rotate your family photos for display, hang a mini boxwood wreath … the creative possibilities are endless!
If you like this rustic striped wood block display, then I would love for you to stop by Shaken Together for a few more of my favorite recipes and crafts!
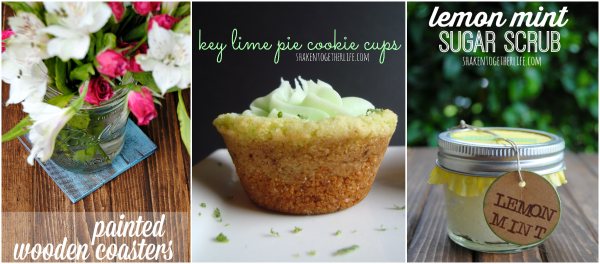
Painted Wooden Coasters :: Key Lime Pie Cookie Cups :: Lemon Mint Sugar Scrub
Very cute idea. Like that you can personalize it easily and it would look really good on a bookshelf. 🙂
Bookshelf – genius, Sarah! Thanks for the sweet comment!
I love this Keri! I think it would be a perfect photo display to make for my husband who just recently moved into a cube at work. Nothing will stick to his walls. Thanks for sharing!
I making another one for my desk at work, too, Kelly! I figure if I’m there so much, it should at least be pretty 🙂
I love this! And it is so easy to make!
I am all about easy projects, Angie 🙂 Thanks SO much for stopping by!
I absolutely love how versatile this is! I can totally imagine switching out pictures and art to match different holidays. Thanks so much!
Me too, Vanessa! Now, I can clip all of your fun printables on it!!
I LOVE the black and white stripes! So eye-catching!
I always thought black & white would be too modern for me, but with a good sanding and a teeny tiny clothespin, it is just rustic enough 🙂
Keri, you never fail to knock it out of the park – – I’m so inspired! You can take such simple items and transform them into a thing of beauty. Definitely pinning this to inspire some of my spring decor.
Lauren – thanks so much! Once I made this, I think I decided Spring is going to be black and white and green this year in our home!
where did you find the cards? Delightful project
Hi Carol – I think I picked them up at a scrapbook store a few years ago. You could probably make something similar by printing or stamping on cream colored card stock. Thanks so much for the sweet comment!
LOVE how this turned out! I am thinking of so man things you could clip under that little clothespin 🙂
Thanks, Laura Beth! I even thought it would cute to hold recipe cards in the kitchen!
This is SO cute-I love it! There are so many ways you could change this up to match any decor or through the seasons-thanks for sharing!
Super cute idea! I have a current love of clothespins! Love the name of your blog too, I don’t get much housework done either 🙂
Holy buckets do I love this! I kinda want it in my home…now! Thanks for sharing!
Such a creative idea, love this for so many uses..notes to self, a pretty picture, cute memo holder. Great job. Pinning!
These are fabulous Keri!! Love this idea!
I LOVE thiS! How perfect would these be for a wedding as table number holders! So chic and adorable!
Cute project!
This is cute. It would also be cute if you had a few that you could pin letters to and spell out words.
This is so cute! Thanks so much for sharing at the Create & Share Link Party. Hope to see you again tonight (7:00 PM MST)!
What a neat idea! I love it! Thanks for sharing on the Monday Funday Party.
Love this! I have a granddaughter due in April, and my daughter has been asking me to make some picture frames. This would be easy, all I need to do is paint it pink and white. Thanks for sharing!
Where can I find the candlesticks? I’ve looked everywhere!