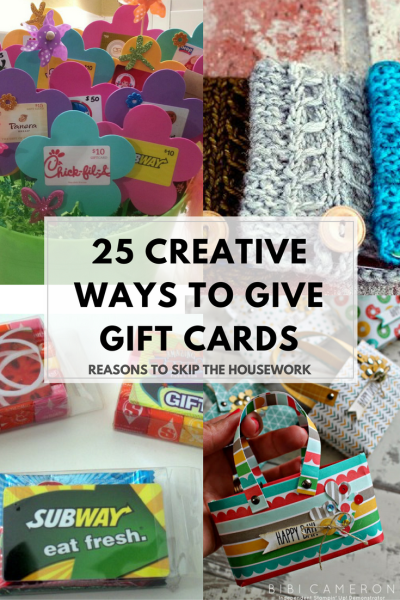
No matter what time of the year it is, you always have a dear someone to give a gift card to. I created this list for those who love to put a little “sweat and tears” into the presents they offer to their loved ones. This list has ideas for teachers, parents, coffee lovers, and more!
When you want to add a personal touch to a gift card, try these creative gift card holder ideas.
Want more awesome ideas for the holidays? Take a peek at our Christmas, art kits, DIY presents, holiday cookie recipes, and ugly sweaters articles. Try also our article about gifts for babies.
25 Creative Ideas For Gift Card Holders
Gift cards can feel impersonal to give to someone you value, so, why not spice up the way you give them? Try to have some fun creating these gift card holders and feel rewarded by making a gift card more personal. These ideas come with instructions, but be creative and innovative with them! Now, with no further ado, let’s see what I prepared for you!
Contents
- 1. Mittens ornaments
- 2. Candy wrapper
- 3. Gift card snow globe
- 4. Kisses gift card holder
- 5. DIY mason jar gift card holder & candy holder
- 6. Crochet gift card holder
- 7. Cute and easy envelope
- 8. Printable gift card holders
- 9. Pop-up gift card holder
- 10. Gift card yarn bombs
- 11. Coffee gift card holder
- 12. DIY gift card envelopes
- 13. Date night gift card holder
- 14. Monster gift card holder
- 15. Cut-out shapes
- 16. Shirts gift card holders
- 17. Gift card holders for teachers and substitutes
- 18. Gift card bouquet
- 19. Easy paper tote bag treat holder
- 20. Tool belt gift card holder
- 21. Shirt pocket card
- 22. Home Depot gift card holders
- 23. Thanks, Coach! gift card holders
- 24. Key ring of gift cards for teacher
- 25. Coffee sleeve gift card holder
1. Mittens ornaments
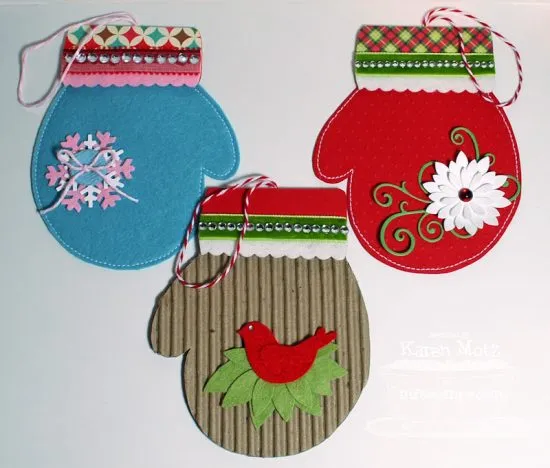
These Christmas gift card holders are super cute and easy to make with lots of room for your personal touch and creativity. The creator designed these gift card holders for the holiday season, but I’m sure you can adapt them to other special occasions, too. Check out these 15 Homemade Christmas Card Holder Ideas.
Source: Karen Motz of Paper Playhouse
Supplies
- Felt
- Card stock
- Glue/adhesive
- Twine
- Decorative bits like ribbon and rhinestones
Instructions
- Print the patterns from Paper Playhouse, or draw your own mitten and cuffs shapes.
- Place the mitten pattern against the felt or other material that will become your mitten.
- Tracing around the mitten pattern, cut out the back mitten.
- Then cut around the mitten pattern again to make the front mitten. Shorten the “wrist” of the front mitten more than the back mitten to display the gift card.
- Stitch or glue the outside edges of the mittens together.
- Fold the card stock, or other material that will become the cuff, in half.
- Line up the cuff pattern with the folded edge of the cuff material.
- Tracing around the cuff pattern, cut out the cuff.
- Stitch or glue the cuff to the mitten.
- Decorate as desired.
- Punch a hole in the cuff, and add a twine loop to make this an ornament.
2. Candy wrapper
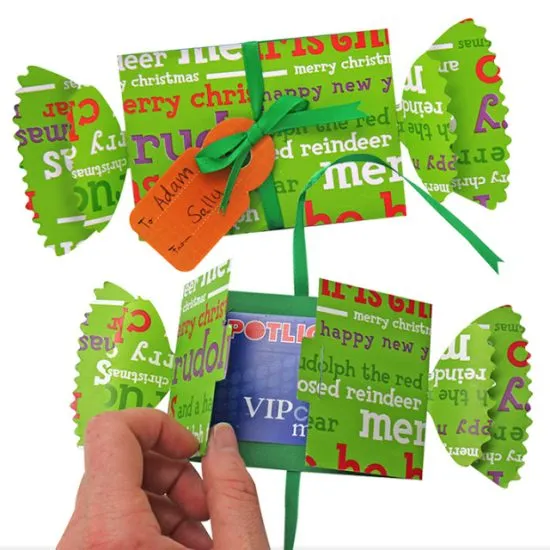
You can use these candy wrapper-shaped gift card holders for many different occasions by changing the type of paper you use. These work great for candy lovers and require few supplies and time to make.
Source: Dabbles
Supplies
- Card stock
- Scissors
- Xacto knife
- Ribbon
- Glue
- Double-sided tape
- Gift tag
- Hole punch
Instructions
- Cut out a 13″ x 10″ rectangle from the card stock.
- Score the card stock at 3″ and 7″. Fold each panel inward.
- Optionally, cut a tab on one end of the card stock. Use an Xacto knife to cut a slot on the other end of the card stock. The slot should be slightly wider than the tab, so the tab fits in it easily.
- Cut out four triangles from the card stock. Two of the triangles should be smaller than the other two triangles.
- Scallop one edge of each triangle.
- Place a dot or two on the pointed tip of the small triangle. Adhere the small triangle to the pointed tip of the large triangle. Let the glue set.
- Glue the scalloped triangles to the back of the gift card holder. Let the glue set.
- Cut a length of ribbon. Center the ribbon on the back of the gift card holder, and glue it in place. Let the glue set.
- Use double-sided tape to stick the gift card inside the holder.
- Punch a hole in a gift tag, and then leave your message.
- Slide one side of the ribbon through the gift tag hole, and tie a bow.
3. Gift card snow globe
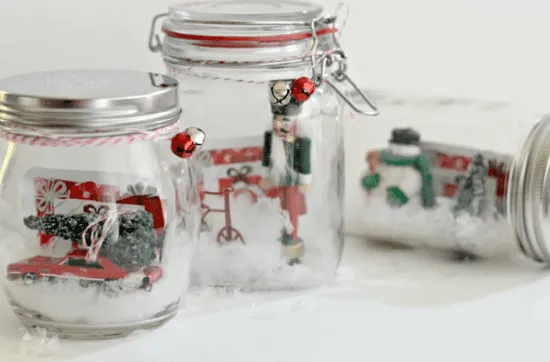
I love the different things you can do with mason jars, like the snow globe gift card holder below – or even this snowman vase! Personalize this gift card holder with small items that speak to your loved one’s personality and interests.
Source: Hip2Save
Supplies
- Wide mouth mason jars or apothecary jars
- Binder clips
- Gift cards
- Hot glue gun
- Glue sticks
- Faux snowflakes
- Cotton or poly filling
- Miniature holiday-related figures or ornaments, or other small items that make you think of the gift recipient
- Any ribbon, twine, or decorations
Instructions
- Glue the flat end of a binder clip to the bottom of the inside of the jar. Let the glue set.
- Slip the gift card into the metal arms of the binder clip.
- Put a layer of cotton or poly filling in the jar, enough to conceal the part of the binder clip glued down. Add fake snow over the cotton or poly filling.
- Add one or two of the bottle brush trees. Add other figures, ornaments, or small items.
- Put the lid onto the jar. Decorate the jar with ribbon, twine, or other embellishments.
4. Kisses gift card holder
With this idea, you can give a little treat along with your appreciative thoughts. Check out the video tutorial for a demonstration of how you can make this card.
Source: Kelly Acheson at A Stamp Above
Supplies
- Bermuda Bay card stock
- Whisper White card stock
- Window sheets
- Glue
Instructions
- Cut the Bermuda Bay card stock to 9 3/4″ and 6 3/4″.
- Score the Bermuda Bay card stock at 1″ and 5 3/4″ on the short sides.
- Score the Bermuda Bay card stock on the long side at:
- 2 3/4″
- 5 1/4″
- 6 1/4″
- 7 1/4″
- 8 1/4″
- 9 1/4″
- Cut and remove the two corners along the short edge at the score lines.
- Cut and remove the card stock along the long edge, between the edge of the card stock and the 5 1/4″ score.
- Snip the scores at 5 1/4″, 6 1/4″, 7 1/4″, and 8 1/4″ to create tabs.
- Fold along the scores.
- Use a Washi tape punch to cut out card stock where indicated in the video tutorial.
- Decorate as desired, using the Whisper White card stock.
- Use a one-inch circle punch on the edge of the front panel so the gift recipient can see the gift card.
- Cut the window sheet to 4 5/8″ by 2″.
- Score the window sheet at 1/4″ on each side.
- Make sure the window sheet fits before adding glue along the long edges, where it connects with the Bermuda Bay card stock. Let the glue set.
- Add glue to the decorative panel, making sure to keep one side open where you will insert the gift card.
- Glue one end of the box closed. Let the glue set.
- Cut a piece of Bermuda Bay card stock to fit inside the box.
- Use a dot of glue on the bottom of five Hershey’s Kisses, and stick the Kisses to the card stock from step 16. Let the glue set.
- Slide the Kisses into the box, and fold down the tabs.
- Tie a ribbon around the box to hold the tabs down.
- Cut a 3 1/4″ by 4 1/2″ rectangle from some Whisper White card stock. This will be your card.
- Decorate the card as desired, and glue to the back of the Kiss Holder.
- Add any other decorations as desired.
5. DIY mason jar gift card holder & candy holder
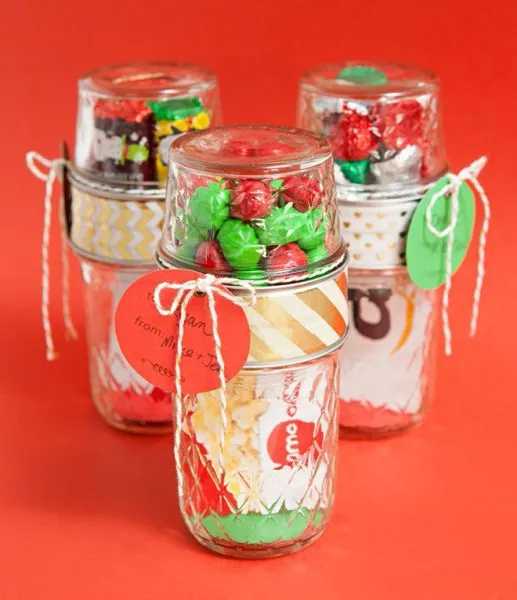
I love how they use two mason jars to impress even more! Double the gift space is the greatest idea so far! You can use Merry Christmas signs as decorations inside.
Source: Jen Causey-Kidder at Something Turquoise
Supplies
- 4 oz Ball quilted crystal jelly jars (regular mouth)
- 8 oz Ball quilted crystal jelly jars (regular mouth)
- Little B – 1″ (25 mm) decorative foil tape
- Gift cards + candy
- E6000 glue
- Twine
- Scissors
- Card stock
- Eyelets and setter (optional)
- Free printable tags from Something Turquoise
Instructions
- Using the E6000 glue, glue the Ball jar rings together. Let the glue set for 24 hours.
- Create, print, and cut out your gift tags from card stock. Download free templates from the source above.
- Punch a hole in the gift tags, and add an eyelet if desired.
- Add candy to the 4 oz jar, and top the jar with a jar lid.
- Screw one of the jar rings onto the 4 oz jar.
- Fill the 8 oz jar with gift shred or a 2″ card stock circle, and add the gift card.
- Top the 8 oz jar with the jar lid, and screw the jar into the glued jar ring set, opposite the candy jar.
- Decorate as desired, like using decorative foil tape around the jar rings.
- Add your gift tag with the twine.
6. Crochet gift card holder
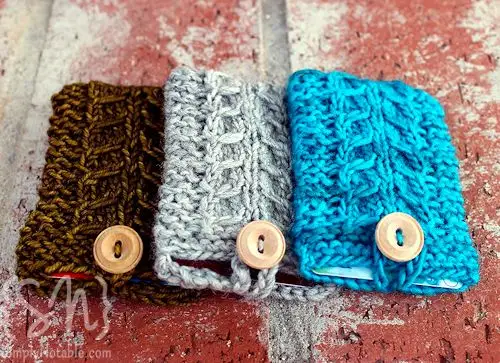
I do not know how to knit, but I may learn to do these cute holders. Your gift recipient will adore getting this holder made with love and filled with a gift card! You can download the pattern at the source below.
Source: Julia Tarsha
Supplies
- Worsted (9 wpi) yarn
- US 6 – 4.0 mm needle
- 3.5 mm hook
- Button
7. Cute and easy envelope
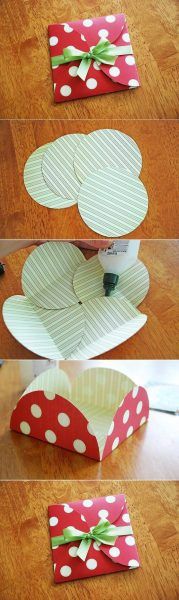
I’ve personally made these sweet holders a few times now. Since the holiday season is super busy, I prefer to make them in advance. These holders are so simple to make – I usually get carried away, and make a dozen! Check out these 25 Holiday Card Displays.
Source: Ideas2Live4
Supplies
- Card stock (150-220 gsm)
- Circular object of preferred size
- Ribbon
- Scissors
- Glue
Instructions
- Use the circular object to trace four circles on the card stock.
- Cut the circles out of the card stock.
- Fold each circle in half without creasing.
- Arrange the circles so that the folds form a square, and one circle overlaps the circle to its left.
- Gently lift one circle where it overlaps another, and apply glue to the card stock. Repeat this with the other three circles. Make sure there is no hole in the center. Let the glue dry.
- Write your note on the square formed by the overlapping circles. You can also use a separate square of card stock for your note, and put it inside the envelope.
- Close the flaps, tucking the flaps under each other.
- Tie a ribbon around the envelope. You can use hot glue to affix the ribbon so it doesn’t slide off.
8. Printable gift card holders
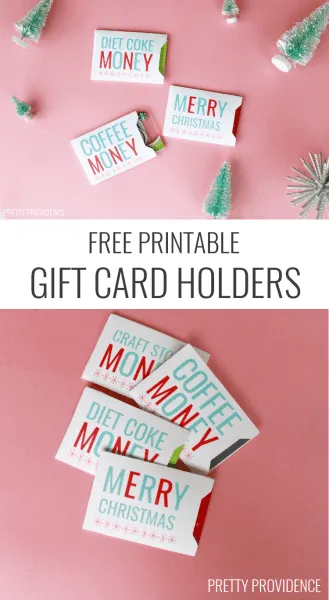
I love printables because they are so fast and easy to make. Also, I’m always a fan of someone else creating the art, and all I have to do is print and offer!
Source: Pretty Providence
Supplies
- Printed template
- Scissors
- Glue
Instructions
- Print the template(s) of your choice.
- Cut along the light gray line.
- Glue the back tab to the front of the sleeve, and let dry.
9. Pop-up gift card holder
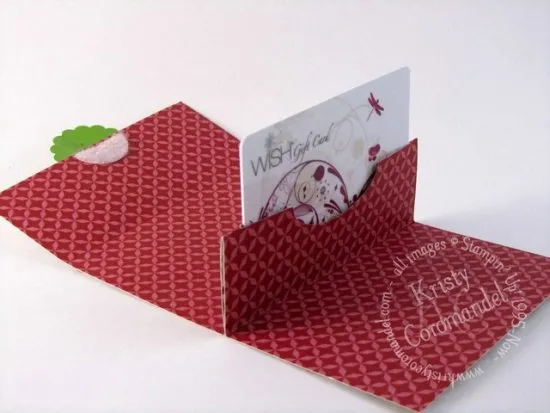
Surprise your loved ones with a pop-up gift card! However, it is easy to make, and you could make a couple of them out of a piece of 12″ x 12″ scrapbooking paper.
Source: Kristy Coromandel
Supplies
- Scrapbooking paper
- Card stock
- Scoring tool
- Bone folder
- 1″ circle punch
- 7/8″ scallop circle punch
- Large oval punch
- Scissors
- Glue
- Velcro
- Double-sided tape
Instructions
- Cut the scrapbooking paper into 4″ by 9 5/8″.
- Score the scrapbooking paper at 1 3/4″, 4 1/2″, 5 3/4″, and 7″.
- Use the bone folder to crease along the score lines, forming a mountain fold at 5 3/4″ and valley folds at the rest of the score lines.
- Use the large oval punch to remove an oval from the center of the mountain fold. You want a half-oval on either side of the fold.
- On either side of the punched oval, cut 1/4″ with the scissors along the 5 3/4″ score line. This will be the slot for the gift card.
- Turn the scrapbooking paper over so the 5 3/4″ score line is now a valley fold.
- Place double-sided tape along the outer left and right edges of the panel. Peel the backing off the double-sided tape, and fold the scrapbooking paper together. This forms the pop-up gift card slot.
- Add your message or greeting to a scrap piece of card stock, using the 1″ circle punch to cut it out.
- Use the 7/8″ scallop circle punch to cut out a scalloped circle from a different color scrap of card stock.
- Glue the message circle to the scalloped circle. Let it dry.
- Glue the scalloped circle to the top of the scrapbooking paper edge so that it overhangs. This will form the seal on the gift card holder.
- Add Velcro to the scrapbooking paper, beneath the scalloped circle. Add the other half of the Velcro to the opposite panel, allowing you to seal the gift card holder shut.
10. Gift card yarn bombs
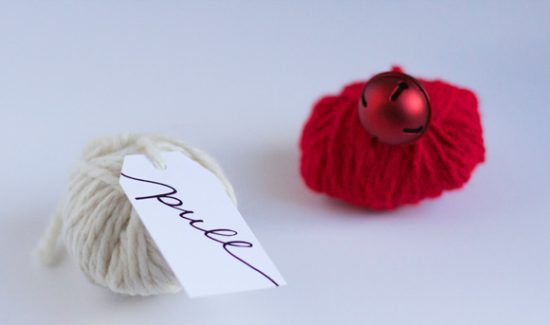
Do you have any yarn or string laying around your house? These darling yarn bombs will surprise anyone and make them smile!
Source: Thoughtfully Simple
Supplies
- Yarn
- Card stock
- Hole punch
Instructions
- Make a tag out of card stock.
- Punch a hole in the tag.
- Wrap a length of yarn around a gift card two or three times. Completely cover the card with the yarn.
- Attach the tag to the end of the yarn.
11. Coffee gift card holder
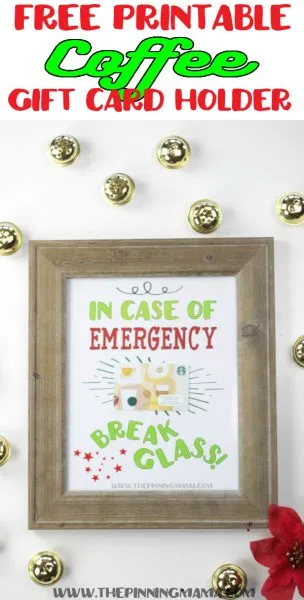
Run to your local dollar store, grab a frame, print out this darling printable (click the source below), and the gift is all done. Also, do not forget about the main piece of this creative gift card holder, the gift card.
Source: The Pinning Mama
Supplies
- “Break Glass in Case of Emergency” gift card holder template
- Double-sided tape
- Frame with glass, 8″ x 10″ or 5″ x 7″
Instructions
- Print the template, and trim to fit the frame.
- Add double-sided tape to the back of the gift card.
- Place the gift card between “emergency” and “break” on the template.
- Add the template with gift card to the frame.
12. DIY gift card envelopes
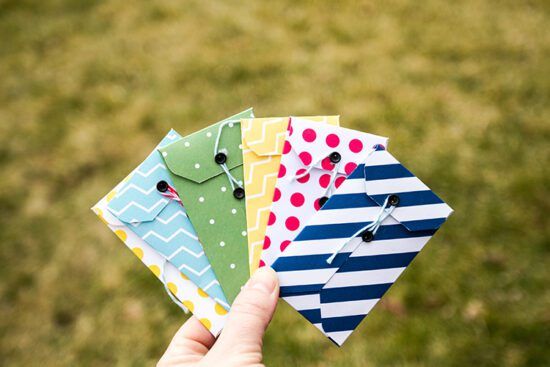
This is such a simple printable template that you use for creating a cute gift card holder. Also, this can turn into an elegant card holder, depending on the scrapbooking paper you use. Use this idea to give something more formal!
Source: Andrea’s Notebook
Supplies
- Scrapbooking paper
- Punch board
- Tape or glue
- Baker’s twine
- Brads
Instructions
- Cut the scrapbooking paper to 5 1/8″ by 5 1/8″.
- Line up the left edge of the paper to number 2 on the punch board. Punch out a wedge.
- Score the paper along scoring line A.
- Turn the paper 90 degrees to the left, lining up the score with the left-side score groove. Punch out a wedge.
- Score the paper along scoring line A.
- Repeat this rotate, punch, and score process with the other two sides of the paper.
- Cut three corners from the square, at 7/8″.
- Fold the large flaps onto each other, placing the flap with the uncut corner on top.
- Mark where the top flap overlaps the bottom flap, and cut off the point.
- Fold up the small bottom flap, and glue or tape the large flaps onto the small bottom flap.
- Add a brad to the top-most flap, and a brad in the center of the envelope. After you add the gift card, wrap baker’s twine around the brads to keep the envelope closed.
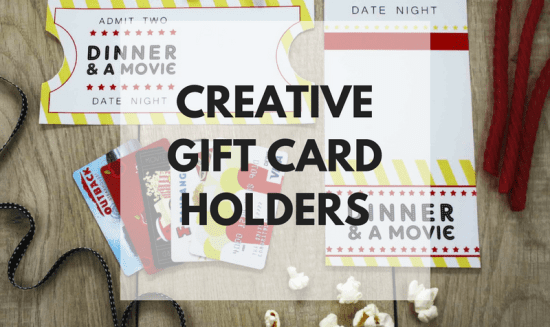
13. Date night gift card holder
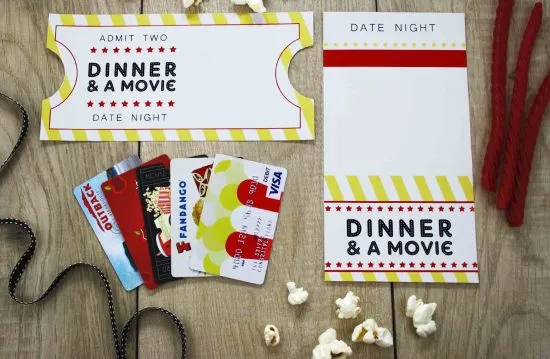
Getting someone multiple gift cards to use on a date night is such a wonderful idea! Not only will this certainly impress your loved ones, but it will certainly make their date nights too. This movie ticket date night is a lovely idea.
Source: Giftcards.com
Supplies
- White card stock
- Paper cutter or scissors
- Double-sided tape
- Downloadable print
Instructions
- Print the gift card holder downloadable print.
- Cut the gift holder out, following the trim marks.
- If you’re using the flat holder, use double-sided tape to attach the gift card.
- If you’re making the folded holder, flip it over.
- Score the card stock at 3-inches and 6 1/4-inches. This should create valley folds right above the yellow stripes and right below the red stripe.
- Fold the card stock along the scoring.
- Use double-sided tape to seal the outer edges of the “Date Night” panel, forming a pocket.
- Use the white space above the gift card pocket to write your note.
14. Monster gift card holder
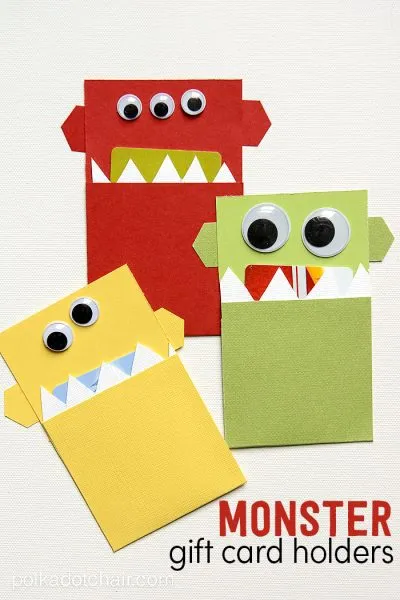
Such an easy-to-make creative gift card holder for someone special! In this way, you can present your gift card using supplies you probably already have in your crafting area.
Source: Polkadot Chair
Supplies
- 3″ x 8″ card stock
- Scrap of white card stock
- Pencil
- Googly eyes
- Double-sided tape
- Shaped paper punch
Instructions
- Score the 3″ x 8″ card stock on the long side at 3″.
- Fold the card stock up at the 3″ score.
- With the pencil, hand-draw zig-zags on the scrap piece of white card stock. These are your monster’s teeth.
- Cut the teeth along the zig-zag, leaving about half an inch of the bottom row uncut.
- Tape the teeth to the folded panel of the card stock using double-sided tape.
- Place double-sided tape on the outsides of the folded panel. Adhere it to the longer panel of the card stock, forming a pocket.
- Use your shaped paper punch to make ears for your monster.
- Add double-sided tape to the ears, and stick them to the back of the card stock.
- Finally, tape googly eyes to the gift card holder.
15. Cut-out shapes
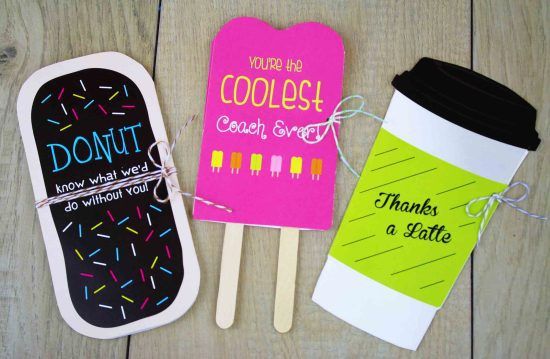
Another printable that you can transform into some cute items that will match the gift card inside of them. Just remember to keep the idea of your gift card, and the result will be amazing!
Source: Giftcards.com
Coffee cup gift card holder supplies
- 8 1/2″ x 11″ white card stock
- Scissors
- Ruler
- Bone folder
- Double-sided tape, glue, or glue stick
- Twine (optional)
Coffee cup gift card holder instructions
- Download the gift card holder.
- Print it on the card stock using the “best quality” and “actual size” settings.
- Cut the holder along the cup outline.
- Turn the holder over.
- Use a ruler and bone folder to score the cup’s midway point.
- Stick the gift card inside the holder with double-sided tape, glue, or a glue stick. You want to use enough to make the gift card stick but not prevent someone from removing the gift card.
- Optionally, tie the holder closed with twine.
Popsicle gift card holder supplies
- 8 1/2″ x 11″ white card stock
- Scissors
- Ruler
- Bone folder
- Double-sided tape, glue, or glue stick
- Popsicle sticks (optional)
Popsicle gift card holder instructions
- Download the gift card holder.
- Print it on the card stock using the “best quality” and “actual size” settings.
- Cut the holder along the popsicle outline.
- Turn the holder over.
- Use a ruler and bone folder to make two scores along the edge of the popsicles.
- Stick the gift card inside the holder with double-sided tape, glue, or a glue stick. You want to use enough to make the gift card stick but not prevent someone from removing the gift card.
- Optionally, cut the popsicle sticks off the gift card holder. Use glue to adhere actual popsicle sticks between the pink panels of the holder.
Donut gift card holder supplies
- 8 1/2″ x 11″ white card stock
- Scissors
- Ruler
- Bone folder
- Double-sided tape, glue, or glue stick
Donut gift card holder instructions
- Download the gift card holder.
- Print it on the card stock using the “best quality” and “actual size” settings.
- Cut the holder along the donut outline.
- Turn the holder over.
- Use a ruler and bone folder to make two scores at the rounded corners.
- Stick the gift card inside the holder with double-sided tape, glue, or a glue stick. You want to use enough to make the gift card stick but not prevent someone from removing the gift card.
16. Shirts gift card holders
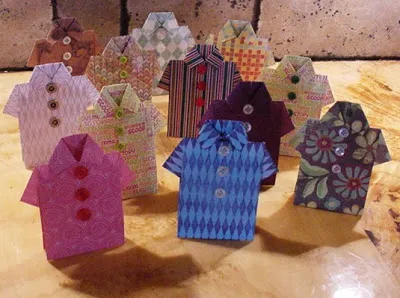
The options are endless with all the different scrapbooking papers out there. Also, you just need a pair of scissors, some paper, and a lot of patience and skill. You will want to follow the step-by-step process with pictures at the source below.
Source: LKC Designs
Supplies
- Scrapbooking paper
- Scissors
- Glue
Instructions
- Trim scrapbooking paper to 6″ by 12″ with the scissors.
- Fold the paper in half, and turn over.
- Unfold the paper, then fold the outer edges in toward the valley fold made in step 2.
- Fold down the top corners, forming the sleeves of the shirt.
- Turn over, and fold up the bottom of the paper about 3/4″.
- Turn over again, and fold the bottom corners toward each other, forming the collar.
- Fold the paper in half, and hook the collar over the front of the shirt. Turn over.
- Fold the bottom of the shirt up about an inch.
- Unfold the shirt so that the collar and the sleeves are at either end.
- Redo the middle three folds into two valley folds with a mountain fold in the center. This will allow the holder to stand upright.
- Place a gift card and note into the back of the shirt, between the sleeves.
17. Gift card holders for teachers and substitutes
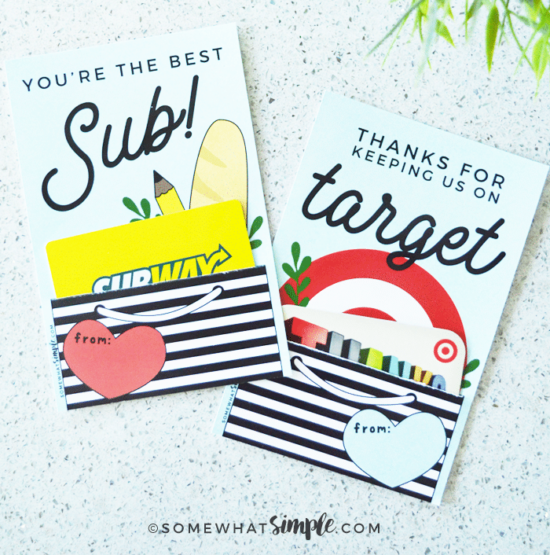
These printable gift card holders are quick and easy to make. All you need to do is print, cut, and add the gift card!
Source: Somewhat Simple
Supplies
- Paper cutter or scissors
- Tape
- Pen
Instructions
- Print the gift card holder.
- Cut a slit along the top of the striped bag.
- Slide the gift card into the slit, and use tape on the back attach it to the gift card holder.
18. Gift card bouquet
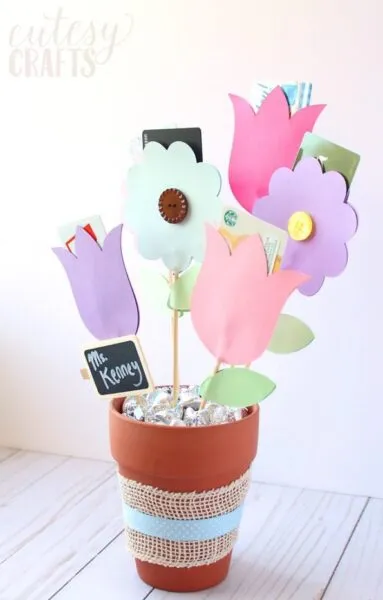
This is such a cute idea for giving multiple gift cards! The gift card bouquet makes a wonderful group gift, like from a bunch of parents to a teacher. You may not know exactly what your kid’s teacher is into, so why not give them options with this multiple gift card holder?
Source: Cutesy Crafts
Supplies
- Flower template
- Flower pot
- Wooden skewers
- Flora foam
- Card stock
- Adhesive
- Hot glue gun
- Glue sticks
- Candy or filler
- Buttons (optional)
- Ribbon (optional)
- Chalkboard tag (optional)
- Paint pen (optional)
Instructions
- Download and print the flower and leaf template.
- Trace twice as many flowers and leaves onto card stock as you are making. Each flower gift card holder uses two card stock flowers. Each leaf uses two card stock leaves.
- Using the hot glue gun, attach a skewer near the end of each flower.
- Add adhesive to the edges of the flower. Don’t add adhesive to the top of the flower.
- Attach a second card stock flower to the adhesive, sandwiching the skewer between two card stock flowers. Add a button if you like.
- Slide a gift card in between the card stock flowers.
- Repeat steps 2 through 6 as needed.
- Place flora foam into the flower pot.
- Add the assembled flowers, sticking the skewers into the flora foam.
- Hot glue one leaf shape to the skewers of your choice. Use adhesive to add a second leaf, sandwiching the skewer between the card stock leaves.
- Cover the foam with candy or filler.
- As desired, decorate the pot with ribbon and a chalkboard tag with the teacher’s name.
19. Easy paper tote bag treat holder
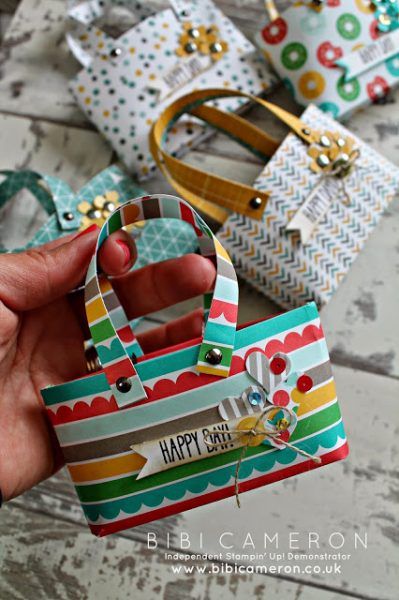
These little tote bags are so cute! This paper crafting project requires some skill and patience, but I believe in you!
Source: Bibi Cameron
Supplies
- 6″ x 6″ scrapbooking paper
- Paper trimmer
- Bone folder
- Scissors
- Double-sided tape
- Hole punch
- Four brads
Instructions
- Score the right edge of the paper at 1 cm.
- Cut a strip 2 cm wide, with the score in the center.
- Repeat steps 1 and 2, and set the scored strips aside. These will become the tote handles.
- Fold the paper rectangle in half, and crease with the bone folder.
- Score the folded paper 1 cm in from the fold and the opening.
- Open the folded paper and create a mountain fold between two valley folds with the three central scores. This forms the tote bottom.
- Fold down the edges at the opening of the tote, along the 1 cm score lines.
- Snip the scores at the bottom of the tote, about 1 cm deep, on both sides.
- Fold in the tabs you’ve just created on the bottom of the tote.
- Turn the tote over, and add double-sided tape on the outsides of the right panel. you want the tape to go all the way to the top and all the way to the bottom.
- Remove the backing, and adhere the edges of the sides of the tote together.
- Add dots of glue to each tab inside the tote, and adhere the tabs to the inside walls of the tote. Let the glue dry.
- Use a hole punch to create holds along the tops of the tote.
- Fold the 2 cm wide strips in half along the score.
- Use the bone folder to crease the strips until they curl.
- Punch holes in the ends of the curled strips.
- Use brads to attach the curled strips as the tote handles.
- Decorate the totes as desired.
20. Tool belt gift card holder
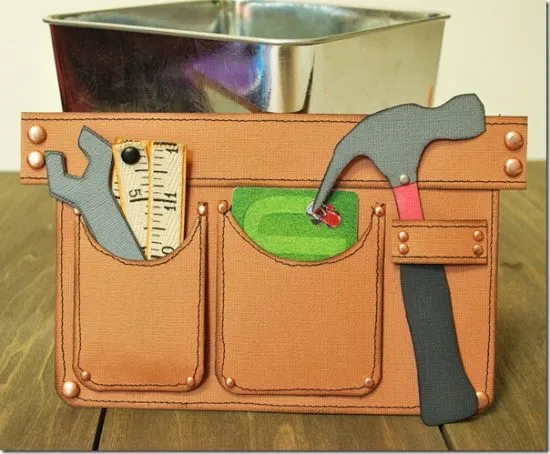
There aren’t any step-by-step instructions available, so we took our best guess at how to make this super cute gift card holder. Feel free to play around with it, and put your personal touch on it!
Source: Examined Life
Supplies
- Brown card stock
- Gray card stock
- Black card stock
- Gray card stock
- Yellow card stock
- Pencil
- Ruler
- Black pen or marker
- Scissors
- Double-sided tape or glue
- 6 large adhesive metal dots
- 13 small adhesive metal dots
- Measuring tape ribbon
- 2 brads
Instructions
- Use a ruler and pencil to measure out and draw a large rectangle on the brown card stock. Cut the shape out with scissors. This will be the back of the tool belt.
- Use a ruler and pencil to measure out and draw two smaller rectangles on the brown card stock. Cut the shapes out with scissors. These will be the pockets of the tool belt. Make sure at least one of these shapes will be wide enough to fit a gift card behind.
- Cut semi-circles out from one end of the smaller rectangles.
- Use a ruler and pencil to measure out and draw one long, wide rectangle and one small rectangle from the brown card stock. Cut the shapes out. The long, wide rectangle will be the top of the belt, and the smaller rectangle will be the hammer loop.
- Using the black pen, draw seams on the brown card stock shapes.
- Use a ruler and pencil to measure out and draw three rectangles, about 4″ long and 1″ wide, on the yellow card stock. Make sure it is wide enough to fit the measuring tape ribbon. Cut the rectangles out.
- Draw a wrench on the gray card stock. Cut the shape out with scissors.
- Draw a hammer on the gray card stock, and use scissors to cut it out.
- Use the gray hammer as a guide for the pieces you’ll need from the red and black card stock. Trace around the handle of the gray hammer on the black card stock. Cut the handle out with scissors.
- Trace around the neck of the hammer on the red card stock. Cut out the neck with scissors.
- Use double-sided tape or glue to attach the black handle and red neck to the gray hammer.
- Use glue or double-sided tape to assemble the belt, making sure to not glue the hammer loop or pockets closed.
- Cut the measuring tape ribbon at 4″, 8″, and 12″. Tape or glue it to the yellow card stock pieces. Use two black brads to connect the pieces.
- Add the adhesive metal dots.
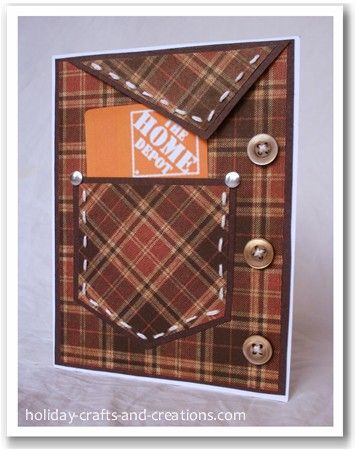
21. Shirt pocket card
I have to say this custom gift card holder is such a clever idea! Consider modeling it after your loved one’s favorite shirt!
Source: Holiday Crafts and Creations
Supplies
- Card stock
- Patterned scrapbooking paper
- Solid color scrapbooking paper
- Scissors
- Embroidery thread and needle
- Double-sided tape or glue
- Buttons
- Metal adhesive dots
Instructions
- Cut the card stock into a rectangle.
- Cut the solid color scrapbooking paper into a slightly smaller rectangle than the card stock.
- Cut the patterned scrapbooking paper into a slightly smaller rectangle than the solid scrapbooking paper.
- Repeat steps 2 and 3 for the collar and pocket.
- Stitch the patterned pocket and solid pocket with embroidery thread onto the patterned rectangle, about 1/4″ from the edge. Leave the top open for the gift card.
- Stitch the patterned collar onto the solid collar with the embroidery thread, about 1/4″ from the edge.
- Tape the top edge of the collar onto the patterned rectangle.
- Sew the buttons onto the right edge of the patterned rectangle.
- Tape or glue the patterned rectangle with attached collar and pocket to the card stock rectangle.
- Add two metal adhesive dots to the top corners of the pocket.
22. Home Depot gift card holders
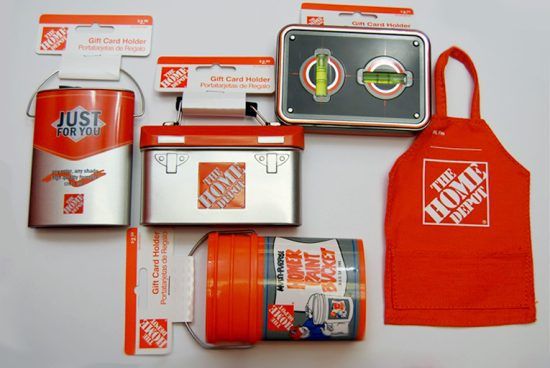
If you don’t have time to make a gift card holder from scratch, run to Home Depot! The hardware chain has amazingly darling gift card holders, like my favorite, the Homer bucket.
23. Thanks, Coach! gift card holders
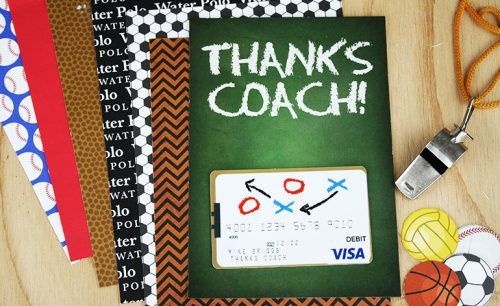
These cute “Thanks, Coach” printables are a perfect way to thank the person by your kid’s side the whole game. These gift card holders are simple and fast to make.
Source: Giftcards.com
Supplies
- 8 1/2″ x 11″ white card stock
- Paper cutter
- Double-sided tape, glue, or glue stick
Instructions
- Download the gift card holder of your choice.
- Print it on the card stock using the “best quality” and “actual size” settings.
- Use the paper cutter to cut out the gift card holder.
- Use double-sided tape, glue, or glue stick to add the gift card to the holder.
24. Key ring of gift cards for teacher
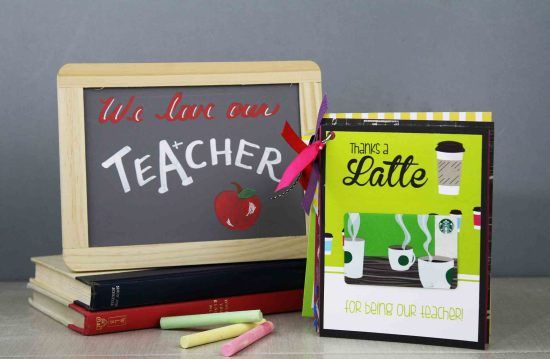
These teacher gift card holders make for a great group gift. And if your kid’s teachers always enter the classroom with a hot cup of coffee, this is certainly a gift for them! Or give them some Thank You Gifts For All Occasions.
Source: Giftcards.com
Supplies
- Scissors
- Hole punch
- Key ring
- Double-sided tape or glue
Instructions
- Print the gift card holders.
- Cut them out, following the guide lines.
- Punch a hole in the top.
- Add the gift card with double-sided tape or glue.
- Repeat for each holder you want to use.
- Put all the card holders on the key ring.
25. Coffee sleeve gift card holder
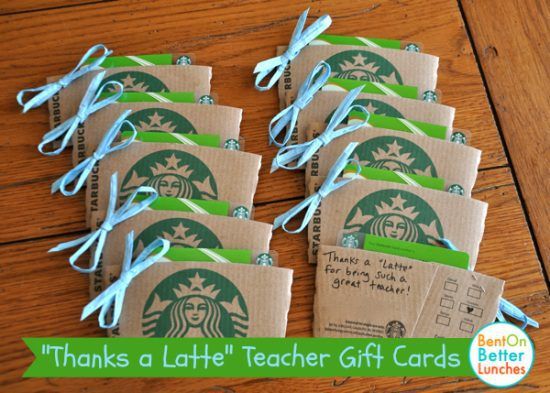
Get creative and use cup sleeves from their favorite coffee shop! This way, you are environmentally friendly, and all the cup sleeves you’d probably throw away can become beautiful presents.
Source: Bent On Better Lunches
Supplies
- Cup sleeves
- Hot glue gun
- Glue sticks
- Ribbon
Instructions
- Seal the bottoms of the cup sleeves with hot glue.
- While the glue sets, make a bow from ribbon for each cup sleeve. Use a dot of hot glue to keep the bow together.
- Then hot glue the bows to the corner of the cup sleeves.
- Write a note on the cup sleeve.
Suggested Read: Succulent Pots
Which is your favorite creative gift card holder?
Finally, as you can see, the options are endless for DIY and creative gift card holders. Putting a personal touch on a gift card will be fun for you and your gift recipient, so spice it up! Try to have some fun creating these gift card holders and, I promise the result will be rewarding.
Please feel free to ask questions and share your creations in the comments. We would love to see your ideas for giving gift cards!
Looking for other crafty card ideas? Check out our Frozen Valentine’s Day Cards article!
Hey Melanie,
Great product, such a great idea instead of the regular gift card wrappers. Can be used more than once.
love these cute gift card holders!! I wanted to share with everyone if your are looking to save money check out gift card granny! It would be awesome to use the discounted gift cards in these cute holders!
Good afternoon,
How do I obtain instructions for the items in this post? Especially the tote bag?
Please email me
Thank you
Judy Johnson